Add Speech to Android App
Adding speech to your application may be beneficial to your users in many ways. Often users who have learning disabilities, or visual impairment may not be able to read the screen. Speech funtionality will help these users and help make your app more appealing.
Today, I will demonstrate how we can add speech, more specifically Text-to-Speech (TTS), also known as speech synthesis to a basic application.
Requirements
In order to follow this example, you will need:
- Install and Dowload Android Studio
- Basic Knowledge of Java Programming Language
Task
Create an Android App which includes a text box (EditText) and a button
When the button is clicked, Android will speak the text in the textbox. When there is no text, it will say "You need to enter text in the textbox, then click the button"
Implementation Steps
Step 1: Create a new Android Studio project:
Project setup
- From Android Studio's welcome screen, click "Start a new Android Studio project".
- From the "Choose your project" screen, select Empty Activity from the Phone and Tablet tab and press Next.
- From the "Configure your project" screen, enter Name: Charming Speaker and Package name: com.csce220.charmingspeaker.
- Set the Language to Java and Minimum SDK to API 28 (Pie) or 29(Q). Note the save location where Android Studio will create the project and press Finish.
Let's look into the project and navigate to the files that are created by Android Studio. The fist important file is ManinActivity.java, another important file is activity_main.xml
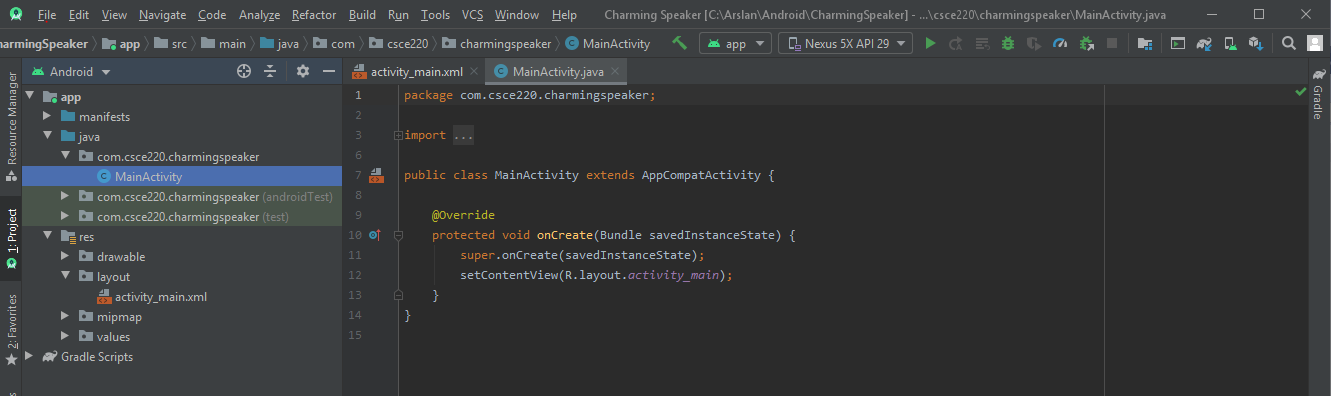
MainActivity.java contains the code for MainActivity, the first activity that runs when the app is started.
activity_main.xml is the layout file for MainActivity. In Android, a layout defines an app's UI, which includes the visual structure and UI components that the user sees and interacts with.
The other important resource that needs to be mentioned for this project is the values folder. The values folder holds the XML files that provide various values used by the app like colors, strings, and styles.
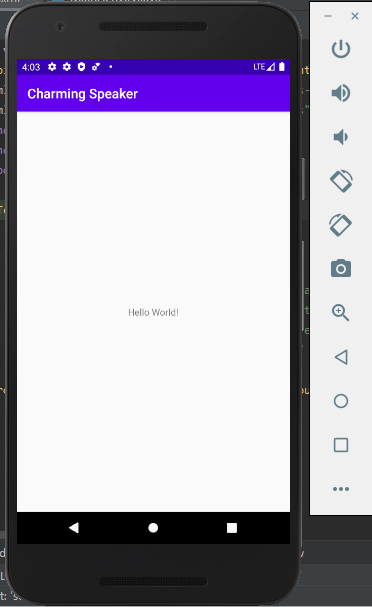
Now, we will run our app and see what's displayed on the screen. First elect Nexus 5X API 29, then click Run button. After waiting a few seconds to a few minutes, we will see the following screen. We can see that there is already a TextView.
Step 2: Create User Interface (UI)
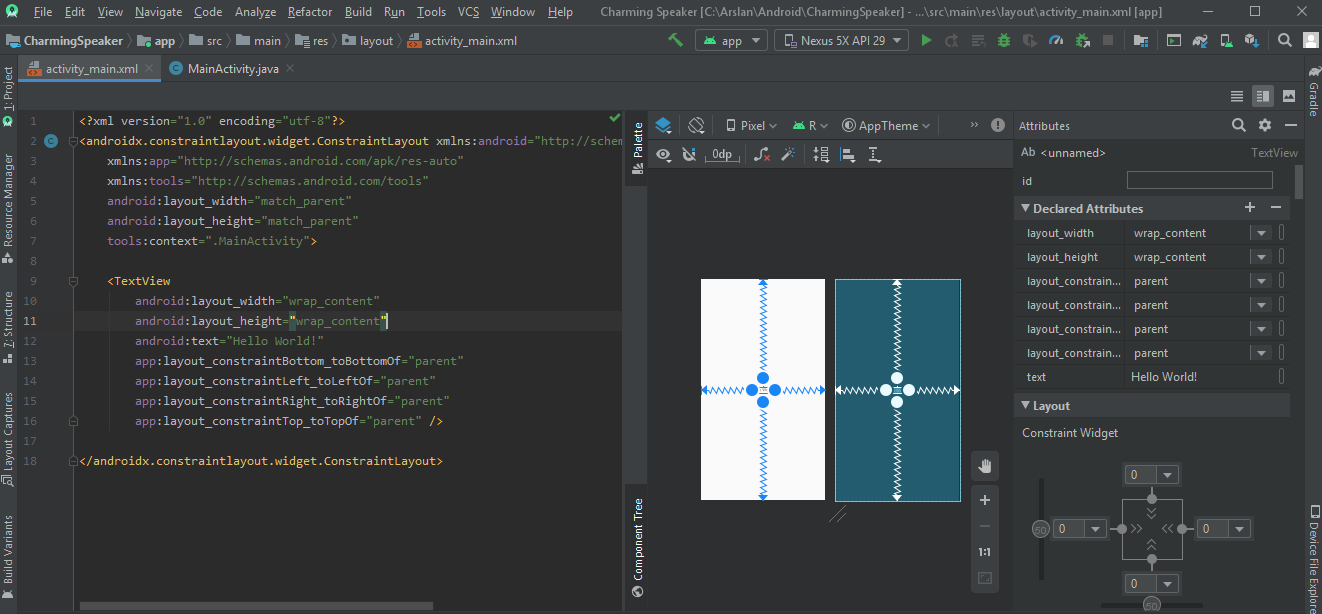
Developing User Interface in Android is fairly strait forward. If you are familiar with XML, you may update activity_main.xml file directly. However if you are not familiar with XML, then you may drag widgets from the Palette section and drop on the UI. You can also drop in Component Tree which is what I do.
We will remove the TextView which is already placed, add two new widgets: one EditText which will let us type text and one Button. We will setup the button onClick event and add logic to read the text from the EditText and speak.
After adding a EditText and a Button, add necessary attributes to make my user interface (UI) more appealing. Below if the UI XML markup.
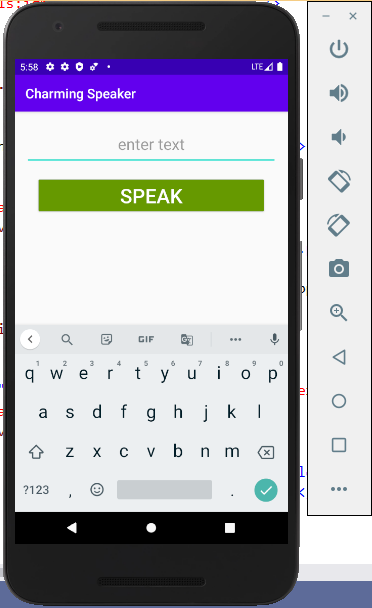
And here is how it looks in Android Emulator
Step 3: Add Functionality (code)
In this project, the place where we need to add functionality is onClick event. In the XML code, onClick event is setup to run doSpeak method.
android:onClick="doSpeak"
The easiest method to create doSpeak method is as follows:
-
Open activity_main.xml file, click on
android:onClick="doSpeak"
then if you are using Windows press Alt+Enter if you are using MacOS press Options+Enter which will add the following code into the MainActivity.java filepublic void doSpeak(View view) { }
package com.csce220.charmingspeaker;
import androidx.appcompat.app.AppCompatActivity;
import android.os.Bundle;
import android.view.View;
public class MainActivity extends AppCompatActivity {
@Override
protected void onCreate(Bundle savedInstanceState) {
super.onCreate(savedInstanceState);
setContentView(R.layout.activity_main);
}
    public void doSpeak(View view) {
    }
}
Often there are three places where we add code :
- Class level (glocal scope) properties and variables
- Initialization code
- Implementation code
Step 3 -1: Class level (global scope) properties and variables
For this project we have two global variables. Both are not accessible from another class but accessible from anywhere within MainActivity class
    private EditText inputTextBox;
    private TextToSpeech speechHandler;
Step 3 -2: Initialization code
Again, for this project we have two objects that are a good candidate for Initialization when our activity starts (layout inflate) Both of which are not accessible from another class but accessible from anywhere within MainActivity class. Within
protected void onCreate(Bundle savedInstanceState) { after
setContentView(R.layout.activity_main);we will add the following
        // Get reference to the input EditText
        inputTextBox = findViewById(R.id.textInput);

        //TTS begin
        // initialize the TextToSpeech object (service)
        speechHandler=new TextToSpeech(getApplicationContext(), new TextToSpeech.OnInitListener() {
            @Override
            public void onInit(int status) {
                if(status != TextToSpeech.ERROR) {
                    // set speaker language
                    speechHandler.setLanguage(Locale.US);
                }
            }
        });
        // TTS end
Step 3 -3: Implementation code
The goal of our app is to speak text. We already set up our button. Now, we need to add logic to the button to read the text which is entered to the EditText then have the TextToSpeech speak. The code is short and simple as follows:
        //Read the text user entered
        String texttoSpeak = inputTextBox.getText().toString();

        //if user did not enter any text, ask user to enter text
        if (texttoSpeak.trim().isEmpty()) {
            texttoSpeak = "Please enter a text in the text box, then click Speak button";
        }
        //speak the text. Hence, Text-To-Speech
        int speechStatus = speechHandler.speak(texttoSpeak, TextToSpeech.QUEUE_FLUSH, null, null);
All java code together in MainActivity.java
Don't forget to include namespaces (import (s))
package com.csce220.charmingspeaker;

import androidx.appcompat.app.AppCompatActivity;

import android.os.Bundle;
import android.speech.tts.TextToSpeech;
import android.view.View;
import android.widget.EditText;

import java.util.Locale;

public class MainActivity extends AppCompatActivity {

    private EditText inputTextBox;
    private TextToSpeech speechHandler;

    @Override
    protected void onCreate(Bundle savedInstanceState) {
        super.onCreate(savedInstanceState);
        setContentView(R.layout.activity_main);

        // Get reference to the input EditText
        inputTextBox = findViewById(R.id.textInput);

        //TTS begin
        // initialize the TextToSpeech object (service)
        speechHandler=new TextToSpeech(getApplicationContext(), new TextToSpeech.OnInitListener() {
            @Override
            public void onInit(int status) {
                if(status != TextToSpeech.ERROR) {
                    // set speaker language
                    speechHandler.setLanguage(Locale.US);
                }
            }
        });
        // TTS end
    }

    public void doSpeak(View view) {
        //Read the text user entered
        String texttoSpeak = inputTextBox.getText().toString();
        //if user did not enter any text, ask user to enter text
        if (texttoSpeak.trim().isEmpty()) {
            texttoSpeak = "Please enter a text in the text box, then click Speak button";
        }
        //speak the text. Hence, Text-To-Speech
        int speechStatus = speechHandler.speak(texttoSpeak, TextToSpeech.QUEUE_FLUSH, null, null);
    }
}
To download the code, click the following link:
Happy Coding!